SIMPLE SUPPER TUESDAY LINKY PARTY!! #25

Wait a minute, how can it be Labor Day? Where did summer go? Good thing it is so beautiful in Maine in September and October! This is my 25th party!! Time to celebrate!

Welcome back to Simple Supper Tuesday, the party featuring QUICK, EASY recipes, perfect for those busy weeknights. So, please share your crock pot, 30 minutes or 5 ingredient recipes (easy desserts are also welcome)!!

Image

Nettie-Moore or Less Cooking Blog

Lysska-Cooking from a Stay at Home Mom

Cindy-Hun… What’s for Dinner?

Make sure to visit all 3 blogs, to see if you’ve been featured this week!! All featured recipes will be pinned to our Simple Supper Tuesday Pinterest page.

Last week’s features:

 Coconut Lime Cupcakes FROM THE LADY BEHIND THE CURTAIN

Coconut Lime Cupcakes - Lady Behind The Curtain

 Walking on Sunshine: Rustic Tomato Zucchini Tart

 Bunny’s Warm Oven: Homemade Chocolate Cake With Peanut Butter Frosting

Homemade Chocolate Cake with Peanut Butter Frosting

. Homemade Biscuit Mix AND Delicious 7-Up Biscuits |  FROM Sidetracked Sarah,

7-Up Biscuits - SidetrackedSarah.com

. Baked Creamed Skillet Corn FROM MIZ HELEN’S COUNTRY COTTAGE

 Easy To Make Breakfast Recipes: Omelet Breakfast Bites FROM A MITTEN FULL OF SAVINGS

Omelet Breakfast Bites

 Cool Off With A Dirty Coke Drink Recipe -FROM  A Worthey Read!

dirty coke drink recipe

. Chocolate Pie with Candied Pecans | FROM Clayton Family Kitchen

pie

Simple Supper Tuesday Badge

Image

The Party Rules
  1. Please link up Crock Pot and/or EASY recipes only (simple desserts are also welcome)
  2. Please follow our hosts, on social media
  3. Please link back to THIS post on Moore Or Less Cooking Food Blog
  4. Please use link to direct recipe, not to your home page.
  5. Please visit others and leave comments if a recipe catches your eye
  6. Any post that DOES NOT contain a recipe or food tutorial, will be deleted
 

Welcome to Simple Supper Tuesday! Please link up your quick and easy recipes, for those busy weeknights.

Thank you for sharing and we hope to see you again next week! ~Nettie, Lysska & Cindy

Link Here:

LEMON POUND CAKE WITH STRAWBERRIES AND CREAM

IMG_3198-001

Strawberry season is here and I can’t get enough of these luscious farm- fresh- melt- in- your- mouth berries. I have 6 quarts of berries and I am not afraid to use them! Marinated berries in delicious Chambord ( Raspberry ) Liqueur brings out the fabulous flavors of the cake and berries.

Hubs loves strawberry shortcake, he has mentioned this to me many times….

I got an idea…how about a lemon pound cake with drunken strawberries?? Oh yeah…it’s so good…IMG_2810

We eat these so fast so I cut a quart up and added Chambord for a delicious treat!

IMG_3209-001

My daughter’s friend brought me a freshly picked container of raspberries from her farm, I threw a couple in there for deliciousness!

LEMON POUND CAKE WITH STRAWBERRIES AND CREAM

CAKE:

  • 1 package Lemon Cake Mix

  • 1 (3.4 oz.) package instant lemon pudding and pie filling

  • 4 large eggs

  • 1 cup water

  • ⅓ cup vegetable oil

Strawberry Topping

  • 1 1/2- 2 cups sliced fresh strawberries

  • 1 Tablespoon sugar

  • 2 Tablespoons Chambord ( Raspberry Liqueur)

Baking Directions for Lemon Pound Cake

  1. Preheat oven to 350°F. Grease and flour 10″ tube pan.

  2. Combine cake mix, pudding mix, eggs, water and oil in large bowl. Beat at medium speed with electric mixer for 2 minutes. Pour into pan.

  3. Bake at 350°F for 50 to 60 minutes or until toothpick inserted in center comes out clean. Cool in pan 25 minutes. Invert onto heat resistant serving plate. Cool completely.

Directions for strawberries:

In a bowl, combine strawberries, sugar and Chambord. Place in refrigerator while cake bakes.

Slice cake, spoon strawberries on top of cake, add whipped topping or whipped cream, serve.

Makes 12-14 servings

Want MOORE Strawberry recipes?

Fluffy Strawberry Lemon Cake

Image

Easy Strawberry Rhubarb Crisp

Image

Strawberry Shortcake Birthday Cake

 LINKED UP Foodie Friends Friday link party palooza banner

munchmonbanner


IMG_0636 

PEANUT BUTTER AND CHOCOLATE PIE

IMG_2942

I promised my God daughter that we would do some baking this summer. I asked her what she was thinking of making and she said a peanut butter chocolate. That is such a coincidence, I have been wanting to make that kind of pie too! I remember that my very talented blogger friend, Joan, from Chocolate, Chocolate and more made a Peanut Butter Pie and went off to search for her recipe.


IMG_2938

We had all of the ingredients except a Graham Cracker Crust and Whipped Topping, so off to the market we went. But first we had to stop and get a little lunch. We decided to visit my daughter at work, lucky us she joined us at our table and took a break with her lunch.

IMG_2940

My God Daughter also brought over her inventory to make me a DUCK TAPE wallet! My choices were food related….can you believe that? Pickles, Mac and Cheese and Leopard Print. I will cherish it forever.

IMG_2941

Melted Chocolate on top of Graham Cracker Crust…so you get an extra bite of chocolate on the top and bottom…

This is a super easy pie that you can put together before a special party, you just need 2 hours refrigeration time, since it was so warm out, I would freeze it instead of refrigerating it for 2 hours next time.

IMG_2943

It tastes like an amazing creamy Peanut Butter Cup! When you have been baking all day and need to wait for your Peanut Butter and Chocolate pie to refrigerate~ you go for a swim at the lake!

IMG_2947

We worked up an appetite with our big swim and got a call from my BFF inviting us  for dinner, she created a a BIG POT of Sausage, Kale, Potato and Bean Soup! With a crusty loaf of bread and our Peanut Butter and Chocolate Pie in hand, off we went!

IMG_2951

I couldn’t wait to slice into this work of art while the kids played baseball in the backyard and the men played Bocce Ball. With Stevie Wonder playing in the background…it was the perfect summer day…watching the Super Moon light up over us, I am thankful for being a Spiritual Bodyguard, when it involves any kind of baking and am so lucky to have such incredible friends who enjoy food as much as I do.

.IMG_2943

RECIPE

INGREDIENTS

  • 1 Graham Cracker Crust
  • 1 cup Creamy Peanut Butter
  • 1 package cream Cheese, 8 ounces, softened
  • 1 cup Powdered Sugar
  • 8 ounces Cool Whip, thawed
  • 1 cup Semi Sweet Chocolate chips
  • 4-6  Tablespoons heavy cream, or more to get a thin drizzly consistency

DIRECTIONS

  1. FOR FILLING: In a bowl, set mixer on medium, cream together peanut butter and cream cheese until smooth and blended.
  2. Slowly add in powdered sugar and mix on low.
  3. Next, add in Cool Whip and mix until fluffy on medium. Scrape down the sides of bowl. Set aside.
  4. For Chocolate: Use a 2 cup Microwave safe measuring cup or bowl, microwave chocolate chips and cream for 1 minute on HIGH. Stir chips and cream until chocolate is smooth. add more cream to get a thinner consistency.
  5. Spread all but 3 or 4 TBSP of chocolate over the crust. Let sit for 5 minutes to set up.Next, add the filling and spread evenly. Drizzle chocolate over peanut butter filling. I had a lot of chocolate left over because my chocolate was very thick, so I covered the pie with it.
  6. Refrigerate the pie for at least 2 hours, if making for a summer party, Freeze for 2 hours. Let pie thaw for at least 2 hours before serving.
  7. Serves 10

RECIPE FROM CHOCOLATE, CHOCOLATE AND MORE

LINKED UP: Our Three Peas


Blueberry Raspberry Bars

//

This is the weather that we Mainers have been waiting for all year.  The kind we dream about on the day after Christmas and we know it will be coming around in oh… about 180 days….. we hold on to that thought and when a day like today happens, we cry and cry…..ok, well maybe I am exaggerating, but I actually do cry when it snows… Where was I?? Oh yeah…Warm, long days, cool nights. Perfect for long evening walks after supper. Longer days means longer baking days. My perfect kind of day. When I turn the oven on and hubs comes in the kitchen and says, “Wow, it’s hot out!” and I snap back, “SHHHHHH, you will jinx us all with your complaining about it being hot out!!” I have been praying for this for months!! No complaining!

I get over zealous when I am baking because I have a million ideas going on. I figure, everything is mis en place, keep going, like a bakery assembly line. But then I realize, who is going to eat all of this??? Also when food shopping. I think I went over board on blueberries and raspberries, how can that be a bad thing I ask you??

Image

These bars are like a Blueberry- Raspberry – better – than- Pie- Dream. I love Pie, any kind of pie, but especially berry pie. I was raised eating pie as the best dessert you can ever have. These are better than pie because it is half the work of making a pie and all the flavor of summer.

Image

Those edges are crispy, buttery berry gooeyness, that you just want to last forever. You can slice them small or slice them bigger like some people do in my family, we won’t mention any names, but they are male.

Image,

Image

RECIPE

Ingredients:
1 cup granulated sugar
1 tsp baking powder
3 cups all-purpose flour
1 cup cold, unsalted butter, cut into cubes
1 egg
1/4 tsp salt
zest from one lemon
Filling
2 Tbsp lemon juice
4 cups blueberries/raspberries (whatever proportions your prefer)
2/3 cup granulated sugar
4 tsp cornstarch

Directions
  Preheat oven to 375 degrees F and grease a 9×13 inch pan.  . 
  For the crust, in a medium bowl, stir together 1 cup sugar, 3 cups of flour, and 1 tsp baking powder.  Mix in salt and lemon zest.  Using a  fork, blend in egg and butter.   Press half of the dough into the pan to form the crust.  
  In another bowl, stir together 2/3 cups sugar, lemon juice, and corn starch.  Fold in strawberries and blackberries.  Spread the berries over the crust.  add remaining dough over the top of the berries.
 Bake for 45 minutes until top is lightly brown.  Cool completely.  Makes up to 24 bars.  

Recipe adapted from Annie’s City Kitchen

LINKED UP 

Foodie Friends Friday MMbadge2

LEMON BLUEBERRY BREAD

I am a blueberry addict! Living in Maine, there are blueberries everywhere and I am ready to pick them anytime! Lemon and blueberries go so well together, the sweet and tart combination is out of this world! Since summer is almost here, I am loving the quick and delicious recipes. I want to spend more time outside in the sun than in my kitchen. This quick bread is amazing, made with yoghurt, it is moist and delicious. I wish that I had baked two loaves because this one disappeared quickly. You will love the smell of this bread baking in the oven, it is heavenly!!Image

Image

ImageImage

Lemon Blueberry Bread

8-10 Servings

Ingredients:

For BREAD

  • 1/2 cup butter, softened
  • 1 cup white sugar
  • 2 eggs
  • 2 teaspoon vanilla extract
  • 1 cup sour cream or yogurt
  • Juice of 1 lemon
  • Zest of 1 lemon
  • 2 cups all-purpose flour
  • 1 teaspoon baking soda
  • 1 teaspoon baking powder
  • 1 cup fresh blueberries

For glaze

  • 1 cup confectioners sugar
  • 2 teaspoons heavy cream or milk
  • 1 teaspoon lemon extract

Directions:

Preheat oven to 350ºF

Cream butter and sugar together with an electric mixer in a medium size bowl until smooth.  Beat in eggs, vanilla, sour cream, lemon juice and zest. In a separate bowl mix together the flour, baking powder, and baking soda.  Mix the dry ingredients into the wet.

Fold in 3/4 of the blueberries into the batter. Turn the batter into a greased 9×5-inch loaf pan and sprinkle the remainder of the blueberries on top of the batter. Bake for about 55-60 minutes or until toothpick inserted in center of loaf comes out clean.

Let bread cool in pan for about 10 minutes, then remove from pan and place on cooling rack to cool completely (about 30 minutes).

Mix confectioners sugar, cream and lemon extract in a small bowl. Drizzle over cool loaf and let glaze set before slicing.

Cooking Tips:

Extra lemon zest can be added to the glaze for added lemon flavor.

Water can be used in place of heavy cream or milk to make the glaze.

Recipe from Cooking With Sugar

WOULD YOU LIKE TO SEE MORE BLUEBERRY RECIPES??

BLUEBERRY CRUMB COFFEE CAKE

Blueberry Crumb Coffee Cake

BLUEBERRY CAKE 

Blueberry Cake

BLUEBERRY DUTCH BABY

Blueberry Dutch Baby

BLUEBERRY WAFFLES

Blueberry Waffles

BLUEBERRY MUFFINS

Blueberry Muffin

BLUEBERRY SKILLET CAKE

BLUEBERRY SMOOTHIE

CLOUDY DAY BLUEBERRY APPLE PIE

EASY BLUEBERRY GRIDDLE CAKES

VERY BERRY NUT CRUMBLE

LINKED UP: munchmonbanner

Guest Post from Lauren Kelly Nutrition~ Pina Colada Popsicles

I am so honored to be a guest blogger for Nettie today. I am a huge fan of Nettie and all of her recipes! Here’s a little background on me… I am a recipe developer, food blogger and the staff Nutritionist at The Bar Method in Montclair, NJ where I offer workshops and individualized counseling. I have written two cookbooks which I am incredibly proud of, The Everything Wheat-Free Diet Cookbook and The Greek Yogurt Cookbook. I’m happy to share my healthy and delicious recipes with all you.
Image
 

My social media:
Lauren Kelly Nutrition
lbmcp@verizon.net
Blog: www.laurenkellynutrition.com
Facebook:  https://www.facebook.com/LaurenKellyNutrition
Twitter: https://twitter.com/LKellyNutrition
Pinterest:  http://pinterest.com/lkellynutrition/
Instagram:  @laurenkellynutrition
My recipe:
Pina Colada Popsicles
I didn’t make these popsicles alcoholic, but if you’d like to add some rum to the yogurt/milk mixture, go for it!  Maybe make half of them with rum and half without.  This way when your kids enjoy their treat, you can have your “adult treat”.  Everyone wins!  And with only 3 healthy ingredients, they are simple to make and delicious.
 
Makes 6-8 servings, depending on size
 
  • 1 1/4 cup coconut Greek yogurt
  • 1/4 cup light coconut milk
  • 2 1/2 cup diced pineapple, divided
 
  1. In a small bowl, mix together yogurt and milk until blended.
  2. Take 1/2 cup of pineapple and stir it into the yogurt mixture.
  3. Take remaining pineapple and blend in blender until smooth, but you can leave it as chunky as you’d like.
  4. Pour blended pineapple onto bottom 1/4 of popsicle mold.
  5. Next pour yogurt mixture, then more blended pineapple until filled to the top (leaving a half inch room).
  6. Freeze for a few hours until frozen solid.


The Best No Bake Bar You Will Ever Eat

The Best No Bake Bar You Will Ever Eat

A dear friend broke her ankle, so Mom and I made her dinner for herself and her family, these bars were supposed to be included with the dinner, but time was running out, so they stayed behind, oh my goodness, these are the best no bake bars hands down. Don’t think that you can just pass them up or only eat one… I am your friend and friend’s don’t lie about such joking matters, these should have a warning label, because you will be in heaven, they are like an amazing candy bar, but so much healthier without all of those yucky chemicals and stabilizers and preservatives. Please! Make them for a party or if you have kids, make sure they eat them, or give them away as a birthday gift to your son’s adorable girlfriend!! I did!!

The Best No-Bake Bars You’ll Ever Eat
1 cup peanut butter
1/2 cup honey
1/2 cup unrefined coconut oil (be sure to use unrefined for the coconut flavor)
2 cups dry oats (not instant)
1 C shredded coconut
1/2 C chopped pecans (optional)
1 1/4 cups dark chocolate chips
1 t vanilla extract

Melt peanut butter, honey and coconut oil over medium-low heat. Once melted, remove from heat and add oats, shredded coconut, chocolate chips and vanilla. Stir until chocolate is entirely melted. Pour into a 9×13 pan and cool in the fridge. When it’s set, cut into bars and enjoy. Store in the fridge. If they last that long!

Recipe adapted from I Hear Exercise Will Kill You~ Love this name!!

Nettie ❤

Cream Cheese Pound Cake

//

Cream Cheese Pound Cake

In case you already don’t know, I am part of The Sunday’s With Joy Baking group on Facebook. Joy The Baker Cookbook is one of my very favorite cookbooks, just ask my friend’s, they will tell you that I rave about it all of the time. To quiet me up, they bought 6 copies for gifts, I guess they got the hint, BIG TIME!

Today I am sharing with you, Cream Cheese Pound Cake. Pound Cakes are a wonderful, easy cake to bake when you need a quick delicious cake to eat plain or accompanied with fruit and cream. Besides making Tunnel Of Fudge birthday Cake for hubs this month, which should have been named, Tunnel Of Love Cake, I also baked Cream Cheese Pound Cake, because Strawberry Shortcake is his favorite dessert. Just add a tablespoon of sugar to a pint of strawberries, let set in the refrigerator for about an hour before spooning over pound cake, with lovely juices, add a dollop of whipped cream. Everyone loves this dessert! Especially my hubby- dub- dubs!

Cream Cheese Pound Cake

2 cups all-purpose flour
1 1/2 tsp baking powder
1/2 tsp salt
1 (8-ounce) package cream cheese, softened
3/4 cup (1 1/2 sticks) unsalted butter, softened
1 1/2 cups granulated sugar
2 tsp vanilla extract
4 large eggs

Preheat oven at 325F, making sure a rack is in the center. Grease and flour a 9×5 inch loaf pan for later.

In a medium bowl, whisk together the flour, baking powder and salt and set aside for a bit.

Either in your stand mixer, or in a large bowl with a hand mixer, beat cream cheese until soft and pliable. Add butter and sugar and beat until fluffy, approx 3 minutes. Add the vanilla and stir until blended, then beat in the eggs one at a time, beating at medium for 1 minute each.

With the mixer on low, slowly add in the flour mixture from earlier and beat until just incorporated. Stop your mixer at that point and fold together the batter with a spatula.

Spoon into your prepared pan from earlier and bake for 30 minutes. After that, rotate the cake, and if it’s browning too quickly, move to an upper rack (my oven browns very quickly, but in this case with the pound cake, it tasted amazing browned and caramelized tasting)
Bake for another 30-35 minutes until a toothpick inserted into the center comes out clean. Let the cake cool in the pan for 20 minutes, then transfer onto a wire rack to cool completely.

It should last for up to 4 days at room temperature, well wrapped.

Linked up to these parties: Foodie Friends Friday

Lemon Lavender Bars

Writing is very personal, too personal.I have not wanted to talk about what has been going on because I just start crying. I can’t write when I am crying, but the ink will not be ruined. My Grandma Frances died last Sunday. I got the call from my Aunt, I knew this, the week before, I felt it the week before and wanted to talk to my Grandma and Aunt. But I have been having migraines, horrible debilitating migraines, where I don’t even know where the days go migraines,  and every night, I just wanted to  take a warm bath, lie down with my lavender eye pillow, and wish my migraine away. I miss my Grandma. She was 92 years old, I thought she would live forever. I can hear her voice now saying, ” I’m not young Lynnette”.  I remember her saying that to me when I was 5, how old was she? Younger than I am now….I can’t pick up the phone and talk to my Grandma, I can only speak to her in my mind. I know what she will say. I know we will both laugh.

Grandma made me Biscotti every year. For my Birthday and for Christmas. Every year, as if her life depended on it. It started, I didn’t get a box in the mail, when I didn’t receive the box of Biscotti, I knew she felt terrible that she could no longer make them for me. She felt worse than I did. I loved those Biscotti, as soon as the box arrived in the mail,  I would to hide them so that my family didn’t eat them all, that day. I didn’t make Biscotti because Grandma made them best. But I do have the recipe and one day I will try to make them. They are twice baked, so not so easy. My Grandma was an amazing cook and baker.She loved that I had a food blog. I remember when she cooked dinner and served everyone, she would stand in the kitchen and watch everyone eat. We begged her to come sit with us and eat. Grandma’s family were farmers and they would make a huge meal for lunch, because they would work it off, course after course after course, the Italian way. I loved her lasagna, I loved her thumb print cookies. I dream of her thumb print cookies. One time we made them together and I wrote the recipe down as we baked them, that was over 40 years ago. She always watched what she ate, she exercised and took care of herself. She smiled with her eyes, we sang to each other every time we spoke on the phone and when she wasn’t singing to me, I would put hubs on the phone and have him sing to her. I knew she absolutely adored him and his singing, we  laughed and laughed about everything, she had the best sense of humor, my Grandma.. Wishing this wasn’t the last time we spoke. What did we talk about the last time we spoke? The weather? Our health? The kids? Work? I don’t recall, I just know that I always loved talking to my Grandma, she always knew the right thing to say to me, I always felt better when we spoke. I love you Grandma. Thank you for always loving me.  I miss you.

I have never made lemon bars, but they are one of my favorite bar desserts. I had no idea how much I would love the combination of lemon and lavender, it is perfect and lemony tart with a light lavender flavor and a sweet and crumbly shortbread crust. I have loved every recipe from Joy The Baker Cookbook. I will make this recipe again, it is perfect for gifts and parties. My kids and hubs kept going back for more. I highly recommend getting the cookbook and making this recipe. You can find the recipe Image

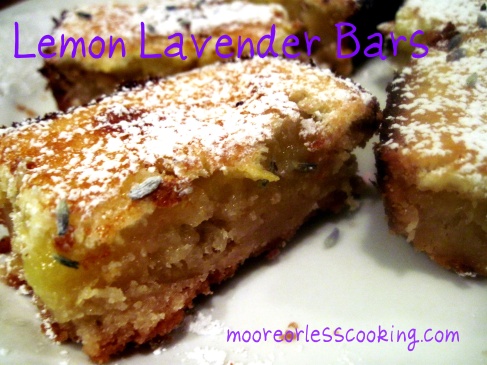
 here. This is one of my favorite cookbooks. I love Sunday’s With Joy Baking Group. I am enjoying every recipe that we make each week. I know it will come to an end soon, but I want this to last forever! Nettie ❤

Joy’s book officially hit the shelves today! Click here to purchase your own copy and check out her blog to see if she’ll be in a city near you to sign it.

Here’s the recipe from Joy The Baker:

For the crust,

2 sticks unsalted butter, softened
3/4 cup of granulated sugar
1/4 cup of packed brown sugar
2 cups all purpose flour
Pinch of salt
1/2 tsp of dried lavender

For the lemon filling,

4 large eggs
1 1/2 cups of sugar
6 Tbsp of all purpose flour
1/2 cup fresh lemon juice
2 tsp lemon zest
Powdered sugar and dried lavender for topping

Preheat the oven to 350 degrees. Butter a 13×9 inch pan and set aside.
To make the crust: In the bowl of a stand mixer beat together butter and sugars until pale and fluffy, 3-5 minutes. Stop, scrape down and add the flour, salt and lavender. Beat on low until dough comes together. Dump the dough into the pan and flatten out with your hand until the base is level. Bake for 18-20 minutes or until slightly browned.

To make the filling: While the crust is baking, In a medium bowl whisk together the eggs and sugar until pale and light. Add the lemon juice, flour and zest. Whisk until completely incorporated. Remove the baked crust from the oven and immediately pour the prepared filling over the crust. Return to the oven and bake for 25 minutes or until browned around the edges and no longer wobbly in the center.
After it comes out of the oven sprinkle lavishly with the powdered sugar and dried lavender.
The bars will stay fresh in an airtight container, in the fridge for up to 4 days.

This post has been linked up to these fabulous blogs!

gs! Grab a ButtonSpatulas On Parade